
Today we’re going to get more familiar with GIMP as we learn some digital image editing concepts!
Let’s talk about FILE FORMATS, RESOLUTION, LAYERS, and TRANSPARENCY.
Let’s talk about FILE FORMATS, RESOLUTION, LAYERS, and TRANSPARENCY.
IMAGE FILE FORMATS
File Formats determine how software interprets the data of the file. Many file formats can be opened only by particular software.
The two most common image file formats are:
If you try to download an image from the internet and the file format isn’t .png or .jpg, you may have downloaded the webpage instead of the image. For example, .html cannot be opened in GIMP.
These image file formats are very distinct from project files that are used by software like GIMP and Photoshop. For example, a GIMP project file has the file extension .xcf. This file saves all of the data that the program handles related to the image, including layers and transparency. So, when you’re wanting to save an image of your GIMP project to use elsewhere, make sure that you EXPORT it (instead of save it) to .jpg or .png.
Learn more about file formats here: https://www.gimp.org/tutorials/ImageFormats/
The two most common image file formats are:
- PNG, which has the file extension .png
- JPG, which has the file extension .jpg (or .jpeg)
If you try to download an image from the internet and the file format isn’t .png or .jpg, you may have downloaded the webpage instead of the image. For example, .html cannot be opened in GIMP.
These image file formats are very distinct from project files that are used by software like GIMP and Photoshop. For example, a GIMP project file has the file extension .xcf. This file saves all of the data that the program handles related to the image, including layers and transparency. So, when you’re wanting to save an image of your GIMP project to use elsewhere, make sure that you EXPORT it (instead of save it) to .jpg or .png.
Learn more about file formats here: https://www.gimp.org/tutorials/ImageFormats/
SPEAKING OF SIZE … CHECK YOUR RESOLUTION!
Image resolution is the amount of detail that an image holds. 300 ppi (pixels per inch) is an average-to-good resolution. Learn more about image resolution here: en.wikipedia.org/wiki/Image_resolution
An image with low resolution will look blurry if you resize too much in an attempt to get a larger image out of a smaller source image. It’s important to work with an appropriately sized canvas for your project; a good rule of thumb is to work at AT LEAST the size of your final product. For example, the size of a poster template in Canva is 768 x 1024 pixels; an icon or logo may be only 100 x 100 pixels. If we imported a background image with a low resolution and small size, then resized it to match the poster size, it would look very pixelated and blurry. For example, do you think that the creators of this ad were working at the right resolution and size?: http://www.idaillinois.org/digital/collection/p16614coll49/id/1409/rec/1
An image with low resolution will look blurry if you resize too much in an attempt to get a larger image out of a smaller source image. It’s important to work with an appropriately sized canvas for your project; a good rule of thumb is to work at AT LEAST the size of your final product. For example, the size of a poster template in Canva is 768 x 1024 pixels; an icon or logo may be only 100 x 100 pixels. If we imported a background image with a low resolution and small size, then resized it to match the poster size, it would look very pixelated and blurry. For example, do you think that the creators of this ad were working at the right resolution and size?: http://www.idaillinois.org/digital/collection/p16614coll49/id/1409/rec/1
WORKING WITH LAYERS
In GIMP and several other graphic editors, you can have multiple layers of information that can be stacked, rearranged or merged together. Read more on Wikipedia: https://en.wikipedia.org/wiki/Layers_(digital_image_editing)
GIMP's resources on layers are great! Read them if you are confused!
https://docs.gimp.org/en/gimp-image-combining.html
https://www.gimp.org/tutorials/Layer_Masks/
NOTE: Always make sure you have the right layer selected when editing your project!
GIMP's resources on layers are great! Read them if you are confused!
https://docs.gimp.org/en/gimp-image-combining.html
https://www.gimp.org/tutorials/Layer_Masks/
NOTE: Always make sure you have the right layer selected when editing your project!
TRANSPARENCY
A frustrating part of image editing is downloading an image only to find out that it has a white background. In this context, transparency (and opacity) refer to the extent that something blocks light. A white background “blocks” lights, whereas a transparent background doesn’t “block” any light. The lower the opacity of a given image, the more transparent it is. This is a variable value. For example: https://www.w3schools.com/css/css_image_transparency.asp
The ability to make images with transparent backgrounds is very important in graphic design. Transparent backgrounds allow you to layer different images to create one image with the desired effect.
NOTE: The JPG file format CANNOT save background transparency information! JPG does not allow for an Alpha Channel, but PNG does. An Alpha Channel is a color component that represents the degree of transparency (or opacity) of a color (i.e., the red, green and blue channels). Learn more here: https://en.wikipedia.org/wiki/Alpha_compositing
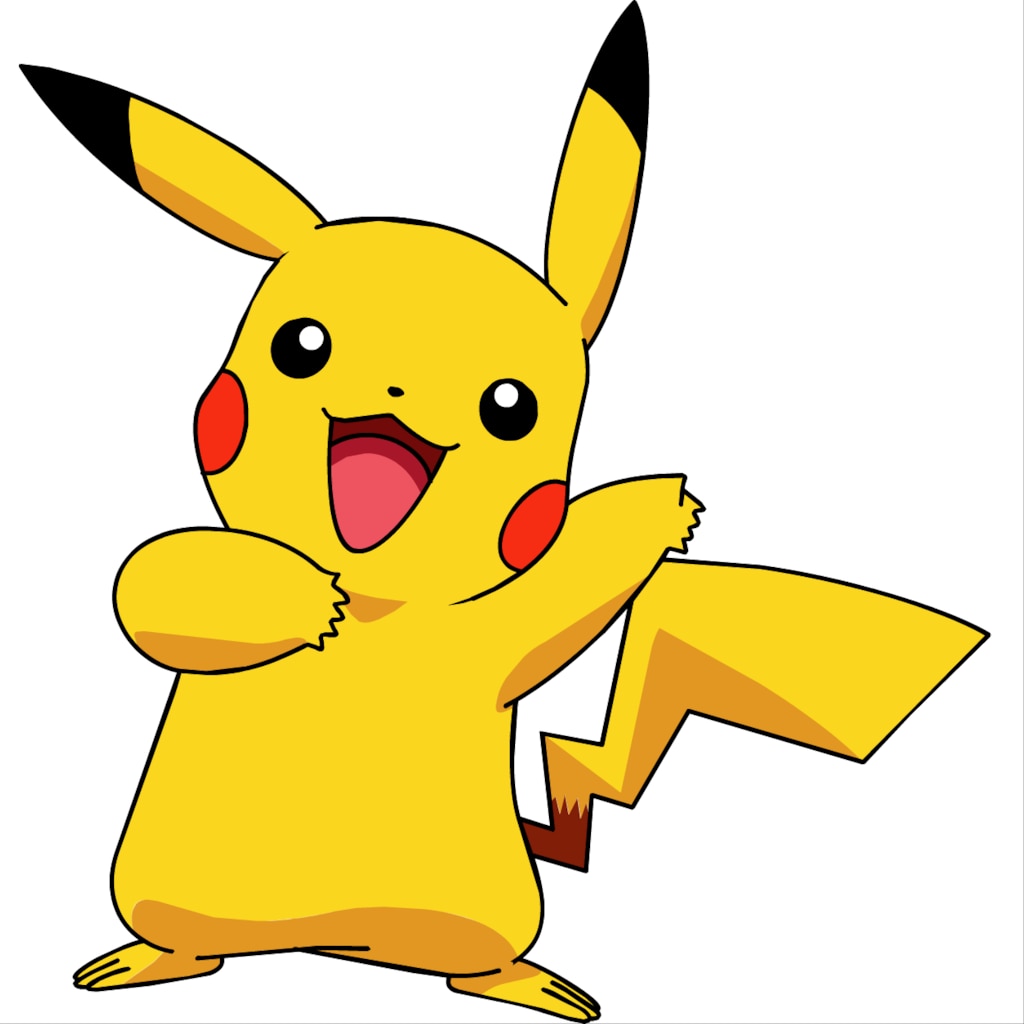
YOUR ADVENTURE TODAY: TAKE PIKACHU ON VACATION!
Pikachu needs a vacation! Where will you take him?
STEP 1: GIVE PIKACHU A TRANSPARENT BACKGROUND.
Download this image of Pikachu:
Download this image of Pikachu:
NOTE: What are the dimensions of this image? Once you download it, you can find out by looking at the details of the file within your file explorer. Keep this in mind during the next step!
Open the image of Pikachu in GIMP.
Before removing the background, you’ll have to add an alpha channel to the layer that contains the image of Pikachu. Right click the layer and Add Alpha Channel.
There are several ways to edit out the background of an image, but most cases the first step is to select either the subject or the background:
Method 1: Select by Color Tool (Keyboard shortcut: SHIFT+O)
Once you click on a specific pixel with this tool, it will create a selection around it and every other pixel with the same color. This tool works great if you have an image where your background consists of just a single color and maybe a few different shades of it.
Simply click on a segment of the image that contains the color you’d like to delete. You can increase the size of the selection by clicking and dragging to the right, or decrease it by clicking and dragging to the left. You can also select additional shades of the same color by holding Shift and clicking on them as well.
Once you’ve created a selection from your background, press Delete.
But wait! What’s wrong with this method for our purposes? How do you think we can fix it?
Method 2: Fuzzy Select Tool (Keyboard shortcut: U)
With the tool selected, click on your subject to create a selection. You can also drag the cursor to the right to increase the size of the selection and to the left to decrease it. You can add to your selection by holding Shift and clicking on another area, and you can remove unwanted selections by holding Control and clicking on them.
More on the Fuzzy Select Tool: https://docs.gimp.org/en/gimp-tool-fuzzy-select.html
You may notice there are a few white pixels left with these methods: that’s normal. You can clean this up by using the Eraser Tool (Keyboard Shortcut: SHIFT+E).
There are some other, more complex ways to get rid of parts of images in GIMP as well: https://logosbynick.com/gimp-delete-background-to-transparent/
STEP 2: ADD ANOTHER IMAGE AS A BACKGROUND LAYER.
Find a background that you like in Google images. Make sure it’s big enough so it doesn’t get pixelated! You can do an Advanced Search of images in google to add a size filter to your search.
Download your background and add it to a new layer in your project.
NOTE: Yes, you can rearrange the order of the layers!
NOTE: You can also resize Pikachu if he’s too big! Can you figure out how? https://docs.gimp.org/2.10/en/gimp-layer-scale.html
STEP 3: EXPORT
Export your new image! Question: Do you have to export as a PNG, or is a JPG fine for your final image?
Congratulations, you did it! Look how happy Pikachu is!
Export your new image! Question: Do you have to export as a PNG, or is a JPG fine for your final image?
Congratulations, you did it! Look how happy Pikachu is!
STEP 4: MORE FUN?
Repeat these steps to add more detail to Pikachu’s vacation. Maybe he needs sunglasses or a cool hat. Remember to re-export your project as a new image if you want to save it!
Repeat these steps to add more detail to Pikachu’s vacation. Maybe he needs sunglasses or a cool hat. Remember to re-export your project as a new image if you want to save it!
Lost? Before you ask for help, think it through, explore GIMP, do some internet searching, and make sure you check out the resources from our poster project: http://cplpng.weebly.com/poster-project.html
The GIMP User Manual is VERY HELPFUL! You can search it for what you need. Open it in your browser, press CTRL+F, and type in a keyword. https://docs.gimp.org/en/
The GIMP User Manual is VERY HELPFUL! You can search it for what you need. Open it in your browser, press CTRL+F, and type in a keyword. https://docs.gimp.org/en/
