
A quick cut-and-paste face swap job Miss Liz made for her friend Chris - funny, but we can do better!
Let's keep working with GIMP! Today we're going to do some face swaps. We'll build on our understanding of layers by adding a new element: masks. Have fun with it!
These instructions are based on a very helpful Youtube video. Please watch it!
https://www.youtube.com/watch?v=j3suey5TQ-E
These instructions are based on a very helpful Youtube video. Please watch it!
https://www.youtube.com/watch?v=j3suey5TQ-E
STEP 1: SOURCE YOUR IMAGES
First, we need to find some images for our face swap project. You will need 2 pictures. They can be whatever you want! Want to put your face on a dog? Sure! Want to put your friend's face on a cat? Great! Want to put Harry Potter's face on Iron Man? Go for it!
You have a few options for sourcing your images:
NOTE: The best face swaps result from well-chosen images. They are most successful when the faces being swapped are pointed in the same direction. Size is not as big of a concern as face orientation, because the images can be scaled. But don't fret! Face swaps are inherently hilarious. A bad face swap is just as good as a great face swap.
You have a few options for sourcing your images:
- Images you find on the internet
- Download the image (.jpg or .png file - remember last week?) to your flash drive.
- Have a picture taken of yourself or someone else in PNG. If you want to take a picture of someone else, you must ask for consent!
- Have Miss Liz help you take the picture with her phone (it's got a great camera!). She will then upload the picture to the Project Files page for you to download to your flash drive.
NOTE: The best face swaps result from well-chosen images. They are most successful when the faces being swapped are pointed in the same direction. Size is not as big of a concern as face orientation, because the images can be scaled. But don't fret! Face swaps are inherently hilarious. A bad face swap is just as good as a great face swap.
STEP 2: GETTING YOUR IMAGES INTO GIMP
Next step is to start up the GIMP software and then open your images as layers:
- FILE > OPEN AS LAYERS > SELECT YOUR IMAGE(S)
- You can SHIFT+CLICK multiple images to open all your images at once.
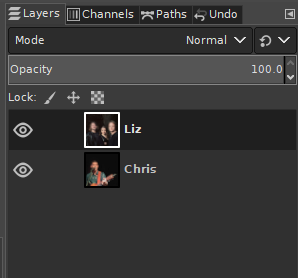
- Rename your layers. Renaming layers can make your work a lot easier, especially if you have a lot of layers.
- Double click the layer name to rename it.
- Make sure your layers are in the proper order. Remember that layers in GIMP are like a collage; one image is laid over the top of another. One image will be your base and will be the bottom layer; the other image is the face you will be imposing on that base layer.
STEP 3: RESIZING AND MOVING YOUR TOP FACE LAYER
Your image(s) probably needs to be resized. You need the face in your top "face" layer to correspond to the size of the face in the base layer.
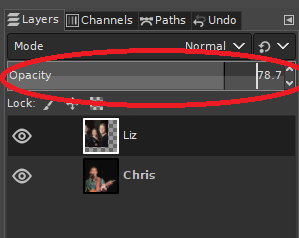
To prepare the top layer for moving and scaling, you want to first change its opacity so that you can see the base layer underneath it.
To prepare the top layer for moving and scaling, you want to first change its opacity so that you can see the base layer underneath it.
- Select your top face layer.
- Lower the opacity until you can see the base layer enough to scale and move the top layer over it as needed.
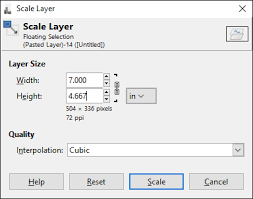
- Select the Scale tool (SHIFT+S or LAYERS > SCALE LAYER) and scale the top face layer until the face is the same size as the face in the base layer.
- Remember that you will need to click "scale" (or press ENTER) in the new window to apply your scaling before you move to the next step.
- Remember that the scale tool will be active until you select another tool. This applies for every tool!
- Move (M) the top face layer until the face matches up with the face in the base layer. Matching up the eyes is a good way to do this.
- Repeat these steps as necessary.
NOTE: There are other transform tools that you might want to try.
- Rotate (SHIFT+R)
- Flip (SHIFT+F)
- Perspective (SHIFT+P)
- Shear (SHIFT+H)

You'll end up with something like this. Look at Miss Liz's face over Chris's face. Spooky!
STEP 4: ADDING A MASK TO YOUR TOP LAYER

Now we want to get rid of everything in the top layer image except for the facial features. We can do this by first adding a mask to the top layer. Learn more about masks here: www.gimp.org/tutorials/Layer_Masks/
- Right click the top layer and Add Layer Mask. A new window will appear.
- From that new window, select White (full opacity).
STEP 5: SAVING FACE - AND NOTHING ELSE

Now that we have a mask on the top layer, we can paint away everything but the facial features of the top layer.
- Make sure that the mask is selected.
- Now select the paintbrush tool (P).
- Make sure the opacity of the paintbrush is 100%.
- Make sure that black is your foreground color and white is your background color.
- Increase the size of the brush as desired - somewhere around 100 or larger is good.
- Increase/descrease the hardness as desired - 25 is good.
- Make sure the opacity of the paintbrush is 100%.
- Bring the opacity of the top layer back to 100.

- Use the paintbrush to remove all unwanted parts of the top layer. Only the facial features should remain.
- If you find you need to move/scale the top layer, make sure you have it selected (and not the mask selected) before moving it!
- When you go back to the paintbrush, make sure you have the mask selected (and not the image) before painting!
- If you find you need to move/scale the top layer, make sure you have it selected (and not the mask selected) before moving it!
STEP 6: COLOR CORRECTION

Now we want to color correct the top layer so that it matches the base layer.
- Make sure the top layer (not the mask!) is selected.
- Select COLORS > CURVES. A new window will open.
- Curve the line until the white balance of the top layer is similar to the base layer.
- You can also try experimenting with the color balance and color temperature.
STEP 7: EDIT AS NEEDED
Something look at little off? Need to make your face bigger or delete a little more? No worry! Just repeat these steps as necessary, always making sure you have the right layer or mask selected.
NOTE: There are many other ways to do a face swap in GIMP. Some people use a Gaussian blur. matthewearl.github.io/2015/07/23/face-swapping-with-gimp/
NOTE: There are many other ways to do a face swap in GIMP. Some people use a Gaussian blur. matthewearl.github.io/2015/07/23/face-swapping-with-gimp/

"Chriz" is beautiful!
Lost? Before you ask for help, think it through, explore GIMP, do some internet searching, and make sure you check out the resources from our previous projects:
http://cplpng.weebly.com/poster-project.html
http://cplpng.weebly.com/pikachus-vacation.html
Are you stuck in GIMP? Check out "Getting Unstuck": docs.gimp.org/en/gimp-getting-unstuck.html
The GIMP User Manual is VERY HELPFUL! You can search it for what you need. Open it in your browser, press CTRL+F, and type in a keyword. https://docs.gimp.org/en/
